Expansion / Contraction in log cabins
Expansion / Contraction in Log Cabins is very commonon with the first year of life. However this is all to do with how timber naturally acts. We know that Log Cabins move, and certainly within the first year of life they can move a lot. I explain this in an article about moisture content in log cabins. It greatly affects the expansion and contraction of the wall logs.
The trouble is this movement can be a bit of a problem if we want to put things on the wall. Or perhaps adding some shelves or fixing machinery. You may even want to partition a portion of your cabin for several reasons. Perhaps you want a shower or a toilet or just a separate storage area. You might also want a thinner log building due to your budget but you would like to insulate the walls to use it as a garden office.
It is easy to do, but we must keep this in mind when doing so. The bloomin’ thing will move and we don’t want to stop it. If we do inhibit this natural movement we can end up with all sorts of horrible things happening such as:
Splits in the logs – This will normally be caused by logs being held together
Gaps appearing where logs have been held – normally by a window frame being screwed to the logs
Moisture entering through gaps and splits
To avoid all these problems,to fix anything to a log cabin wall this is the simplest and best thing to use:
Expansion slat for log cabins
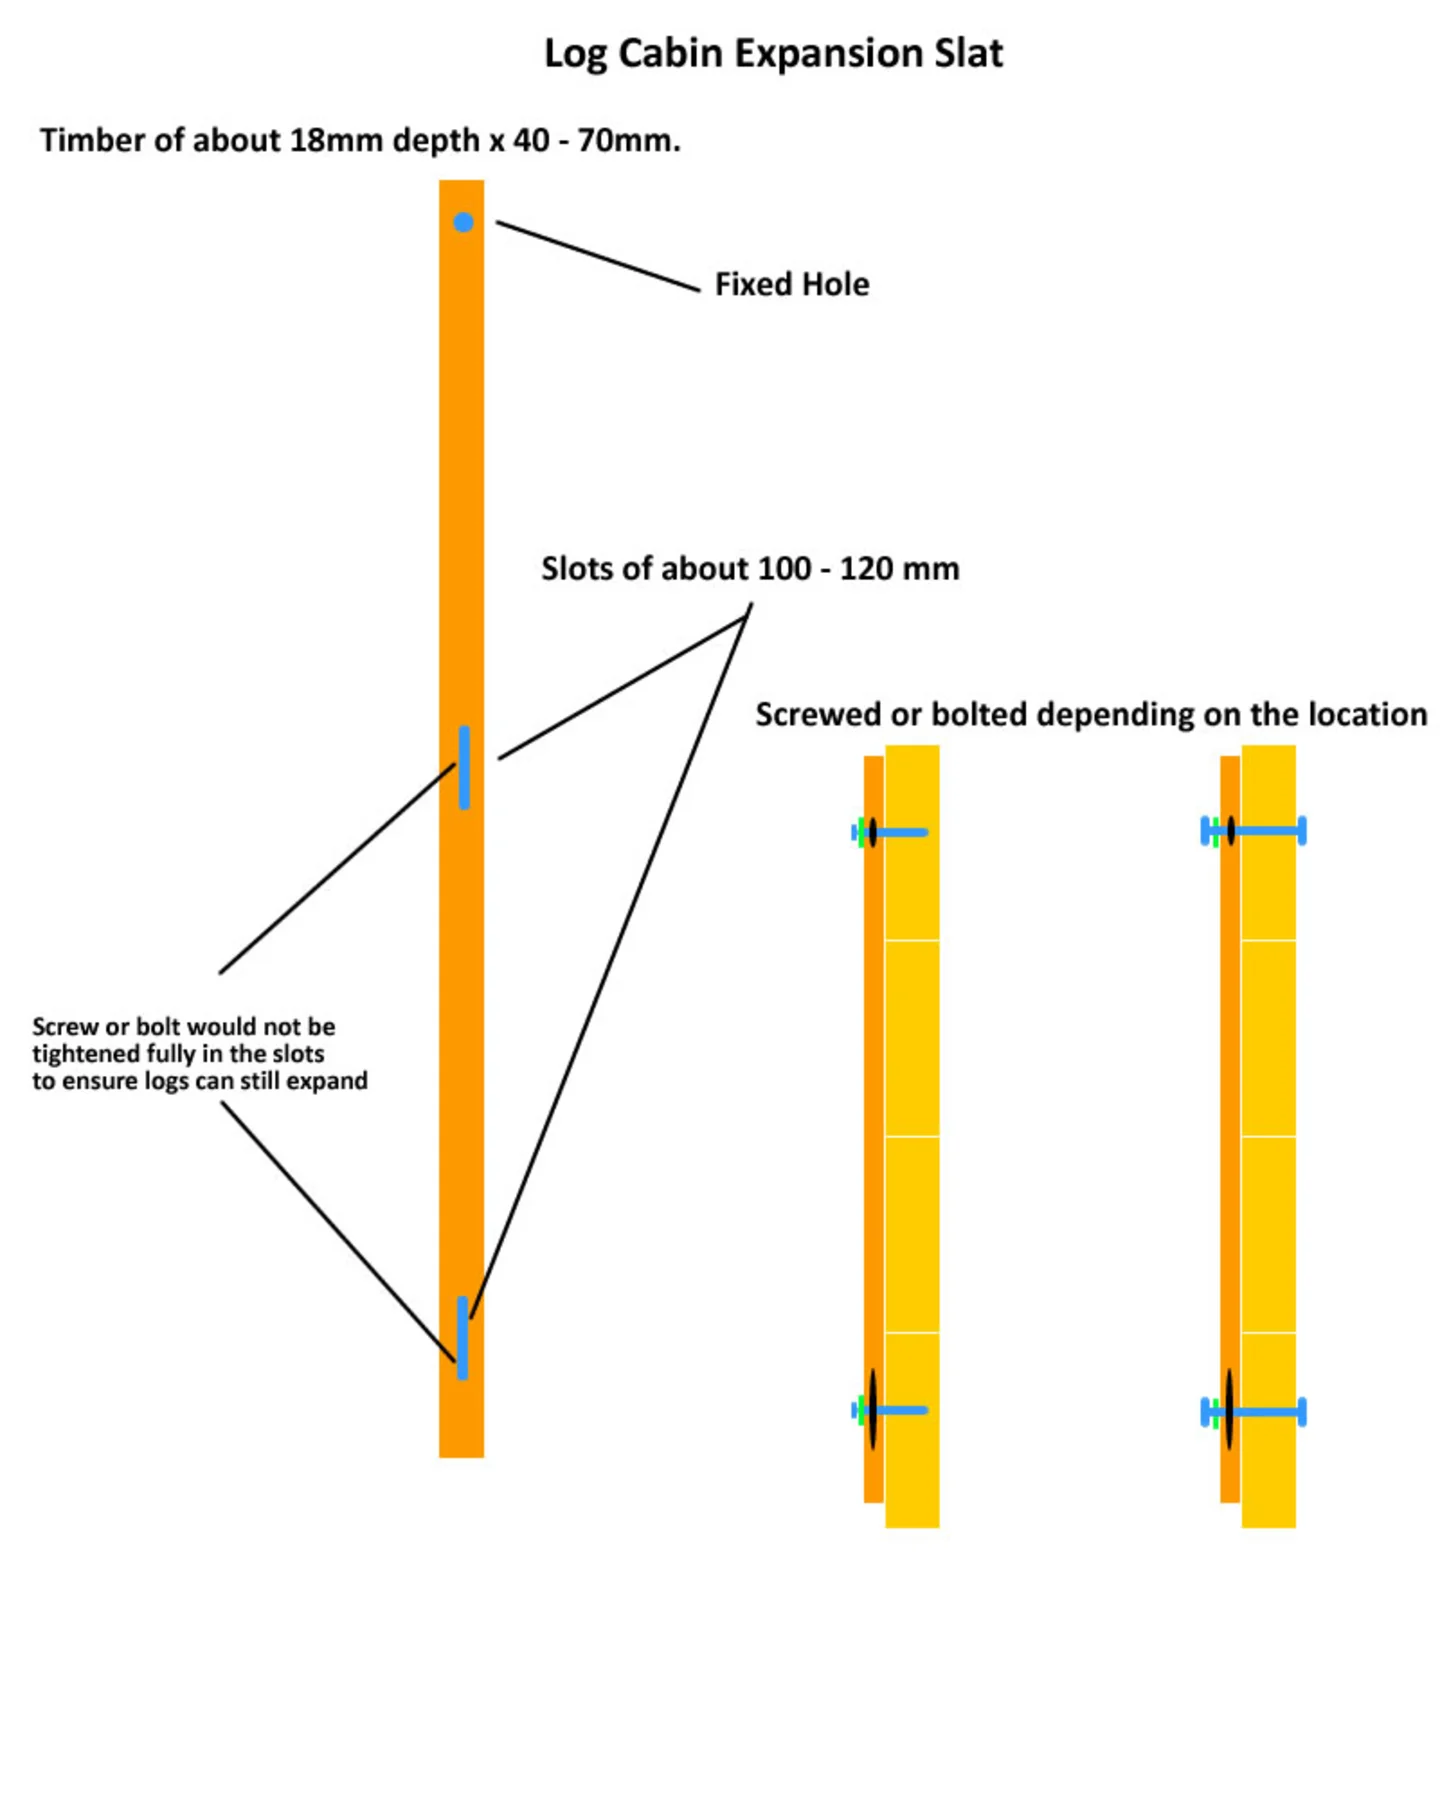
Expansion slat for use in a log cabin to still allow movement of the logs.
This is a handy bit of wood and you can make it out of left over floorboards or roof boards. Any timber will suffice though and you will pick the thickness depending on the job you want it to do.
I often advise customers to make these for use as storm braces when in exposed locations. Off-cuts from the roof or floor boards are fine to use. In order to make them inconspicuous, you place them behind the corner interlocks. This slat will then be fixed to the top log and the bottom of the slat to a lower log, tying the whole cabin together.
The very simple principle here is that we have one fixed hole at the top and slots in the middle and end (depending on the length). Top hole screwed tight, slot screws tightened with washers. This allows the logs to move behind the bracket.
Shelf fixing in a log cabin
Using this system you can put up shelves, cupboards and fix tools to the walls:
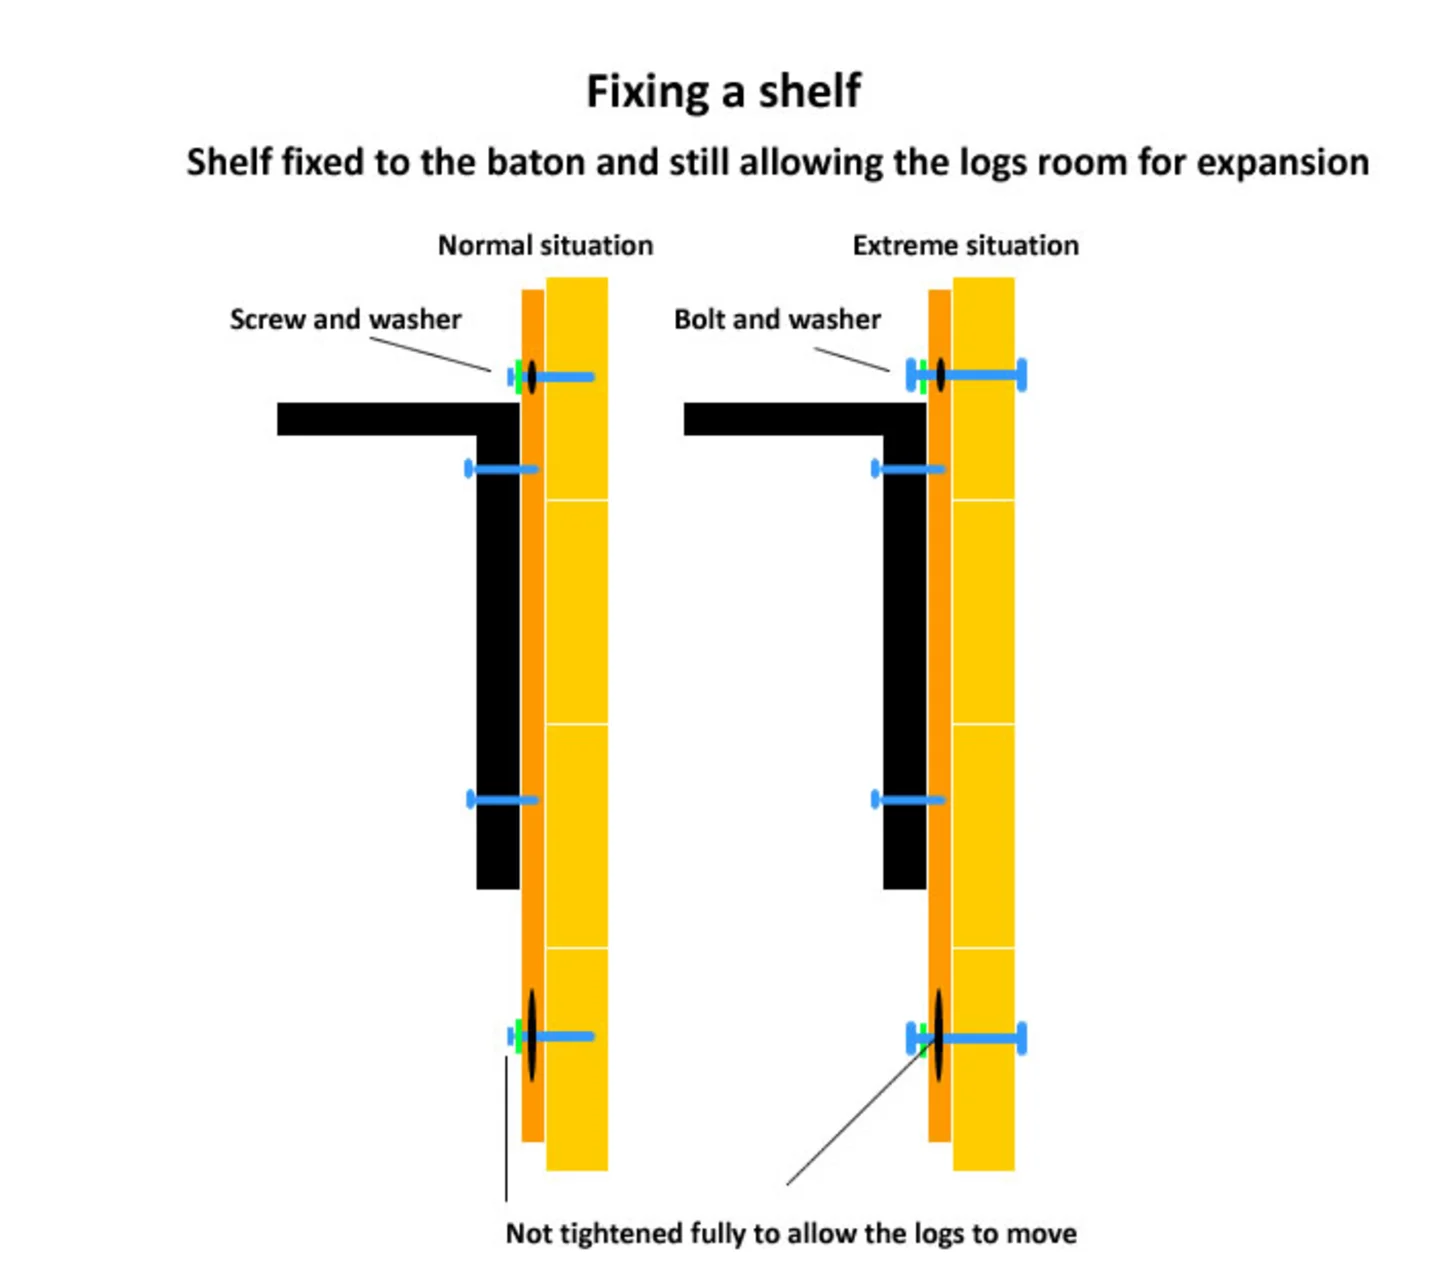
Expansion slats for fixing things to the walls. Using this slat will allow the logs to still expand and contract.
You will see from my diagram that we are fixing the shelves to the expansion slat, not to the logs. For heavier duty uses you may want a thicker slat and bolt it fully through the log cabin wall.
In addition to securing cupboards to walls, it’s also useful for securing consumer units.
NOTE: in the first month or so a log cabin will settle quite a bit from first being erected. It’s best to leave it for a few weeks before adding brackets and securing fittings. Within the first year the cabin will move the most as the wood needs to ‘die’ a little more. Year two will be a little less. Years three, four and onwards the movement is hugely reduced. Also remember the most important thing with a log cabin is to properly treat it. Proper treatment with a good depth of treatment will greatly inhibit the natural contraction and expansion and reduce it to a minimum. More details on Treating a log cabin
Partition walls in a log cabin
The same as you do in your home you may wish to put a partition wall into your log cabin. You can do so as long as you remember the log cabin is always moving!
Using the simple principle of the ‘expansion slat’ explained above we can create slots in framing and make a wall as any stud wall would be made remember though the slot fixing should not be fully tight and always allow the logs to still move in both contraction and expansion.
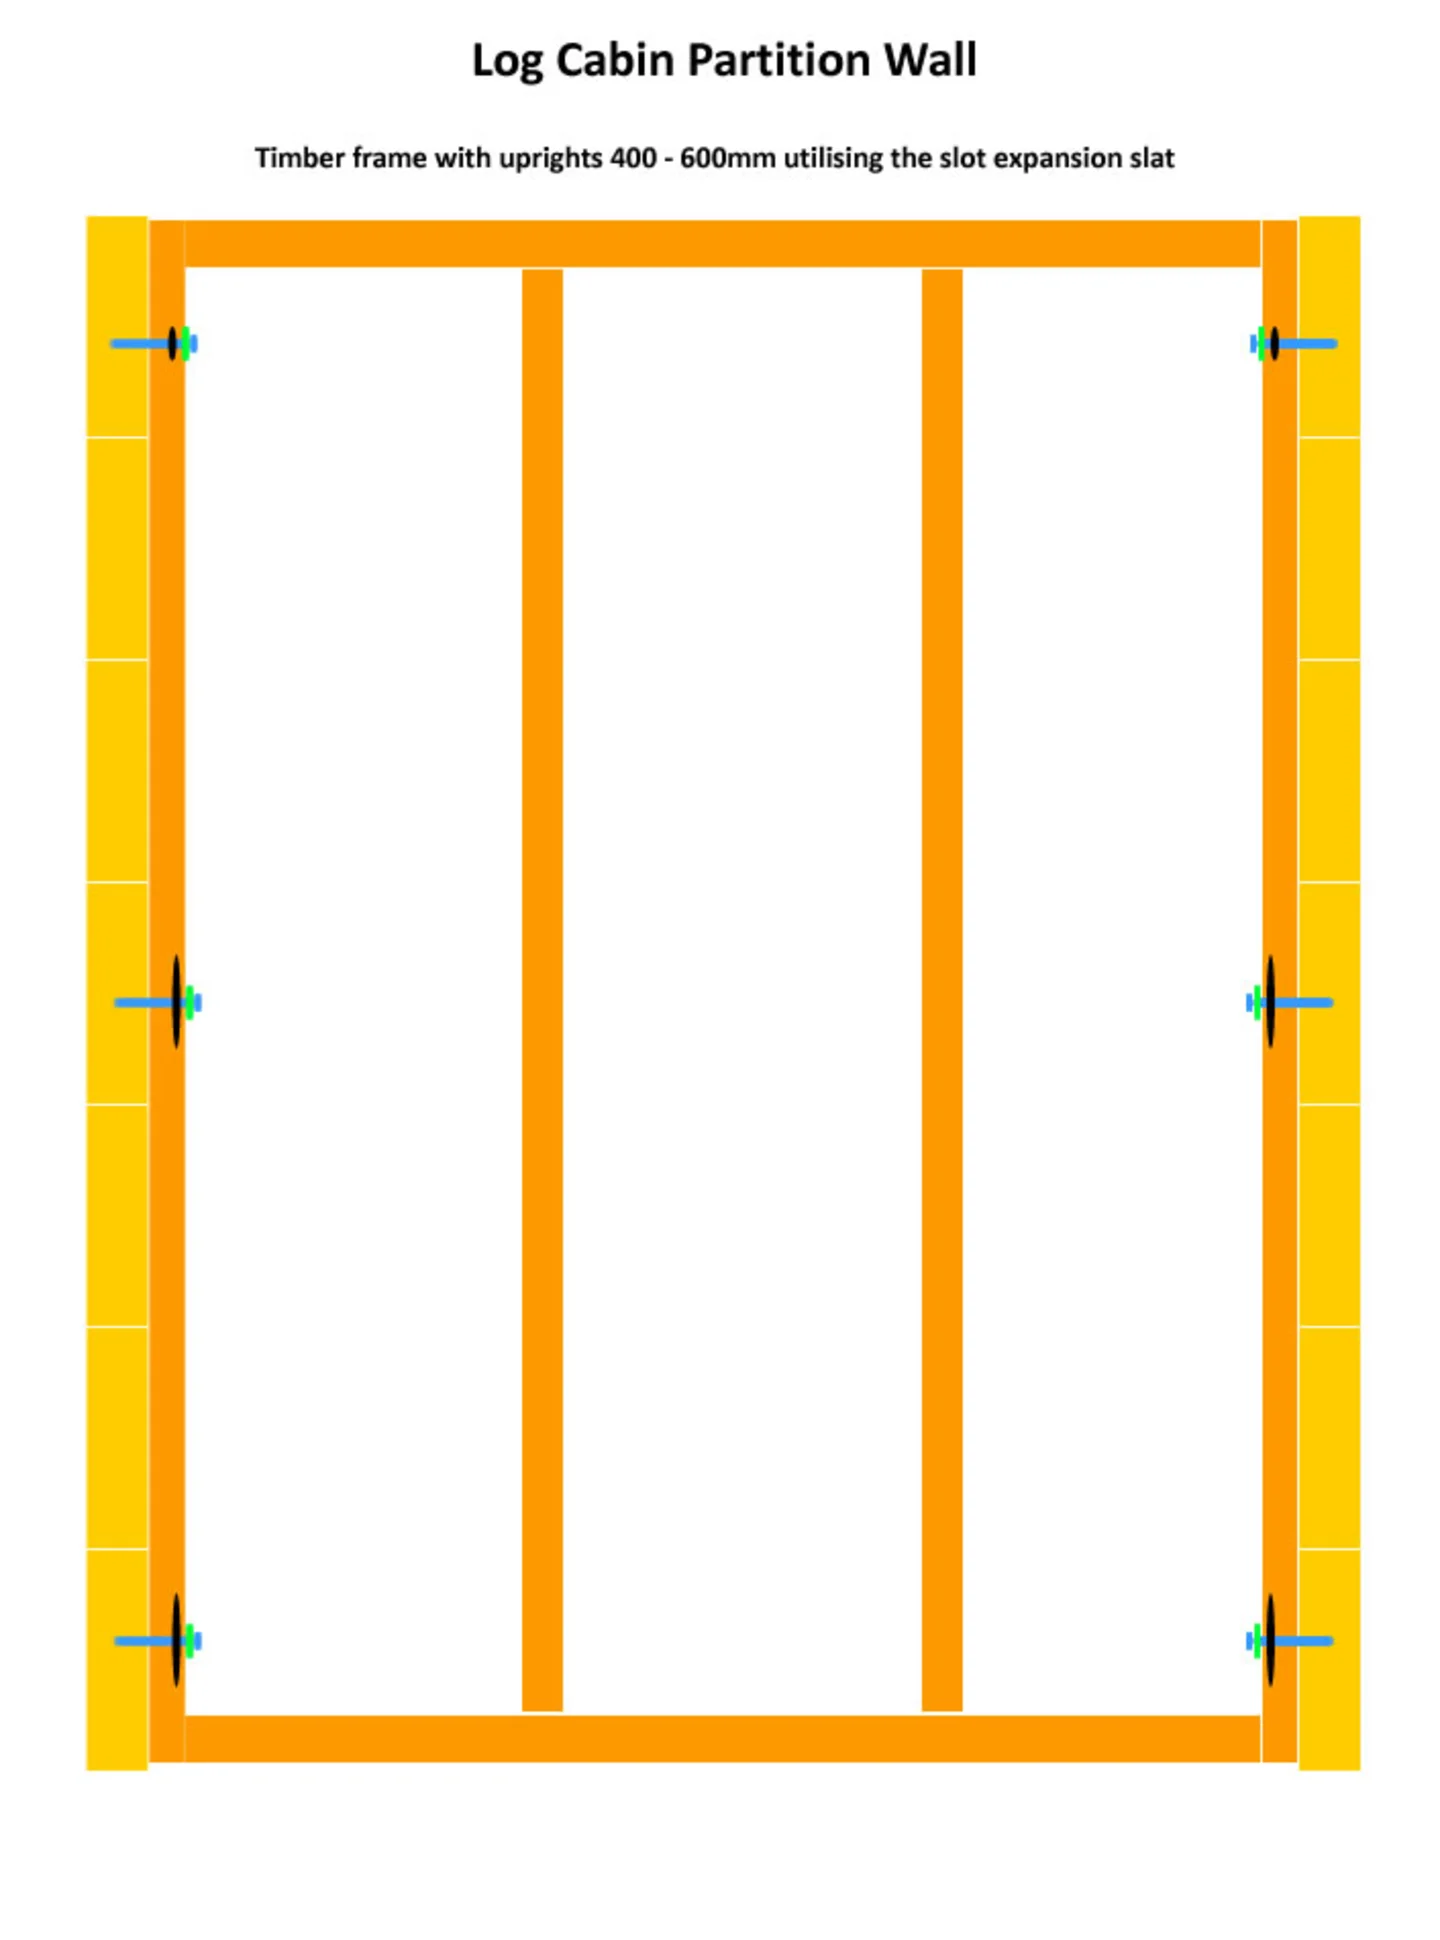
Partition wall framing in a log cabin
You would make a partition wall as you would any stud wall and probably with noggins for extra strength. Your final surface covering could be anything you would like including plasterboard. Nevertheless, fixing it to the floor is a mistake. Like the wall logs, the floor will be expanding and contracting as well.
Expansion / contraction in twin-skin log cabins
You may have seen twin skin log cabins in the market. I’ve put a couple of these up and they really are a challenge, I don’t like them for a number of reasons. Mainly the design intent is all wrong but I will not expand further here. If you require my personal thoughts please feel free to ask me.
Instead of a twin skin design I prefer making an inner wall, that’s independent to the main log cabin wall. The advantages of this method are particularly useful if your budget does not allow you to buy thicker logs in order to build an insulated log cabin.
Also, if you are obtaining building control approval because you intend living in the cabin then it will need to be insulated to building standards. Thicker logs certainly help with insulation but sometimes a control officer will want more. I’ve been involved with several projects and a building officer will often ask for 50 – 100mm thick insulation in the walls (depending on the log thickness) and 100mm in the roof with 70mm in the floor. The roof and floor is easier as I make mention here: Insulating the floor and roof of a Log Cabin.
It’s completely fine to add an inner wall to your cabin and fill the cavity with insulation. As long as you bear in mind that the logs of the cabin itself are always moving as previously explained.
NOTE: Also though consider what you are going to do where the logs join the roof, we cannot restrict the contraction and if the cabin is dropping over the summer if you have not allowed enough room the roof could end up sitting on your internal frame causing a gap to be formed.
Allow for the contraction as well as expansion!
This explains how you can create an internal wall to allow insulation inside the log cabin:
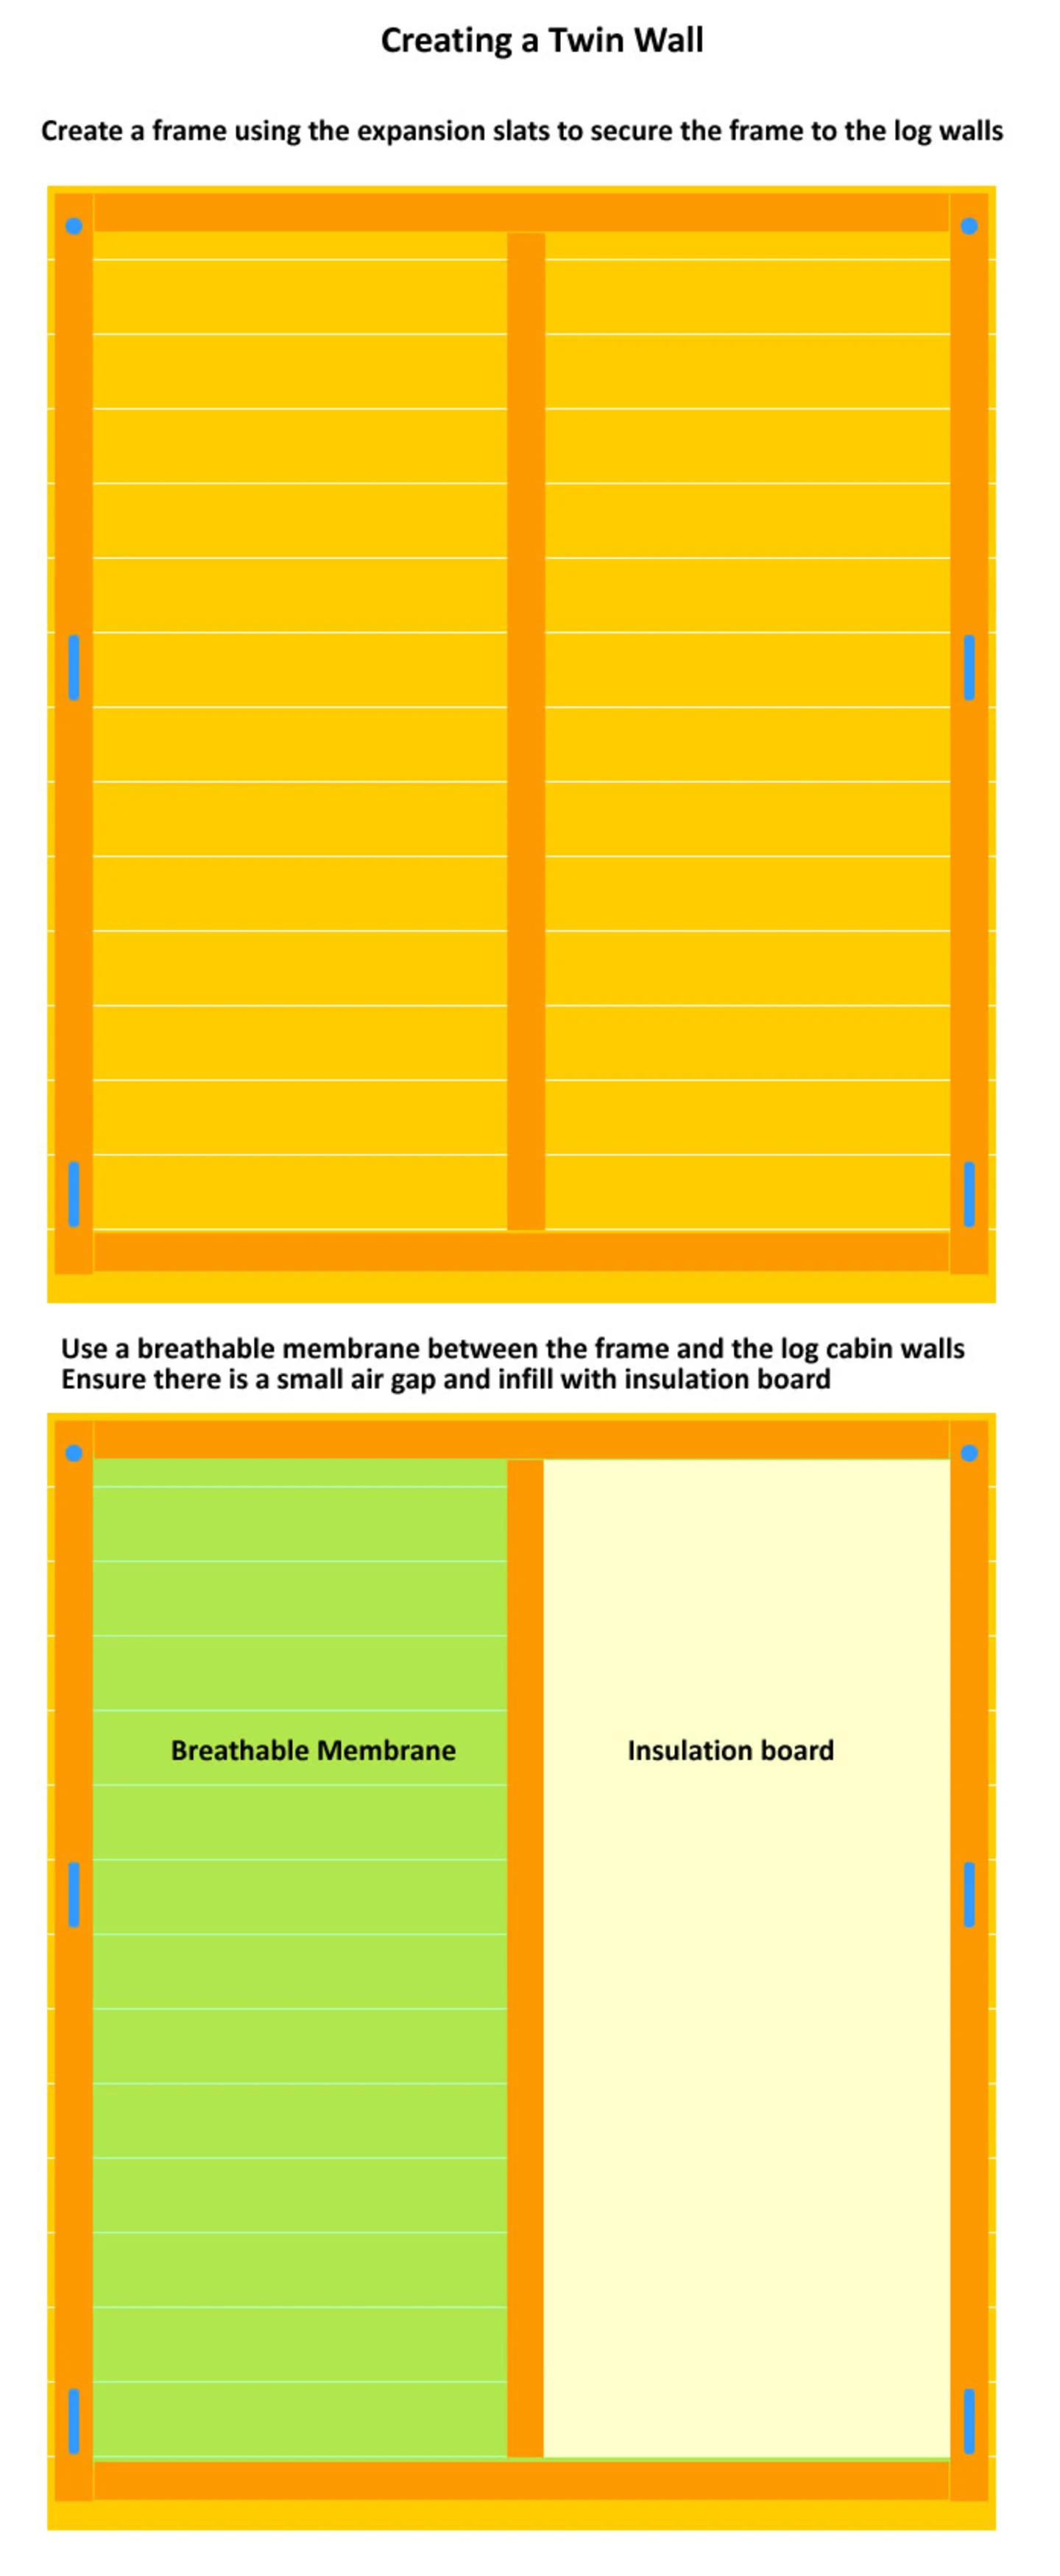
Creating a twin wall log cabin using the same expansion slat principle
Using the same principle with the expansion slat we can create framing internally against the wall. The frame will of course depend on the depth of insulation required but employ the same methods and remember the logs need to move independently.
Building control will ask for a breathable membrane, followed by a small air gap, and then the insulation in between the frame. On top of the frame you will place your surface covering. Timber logs of 28mm looks good or use a thinner cladding for economy or perhaps plasterboard for a smooth sleek, modern finish.
You still have the option of insulate the roof on the outside if you’re lining the walls. The reasons I like it on top of the roof is:
It’s generally easier and quicker
It’s less expensive
No cavity is formed to collect condensation
If you are cladding the inside in timber and putting insulation on top of the roof you will still maintain the look and feel of a log cabin and benefit from the space the vaulted roof provides.
This is an example of insulation on top of the roof:
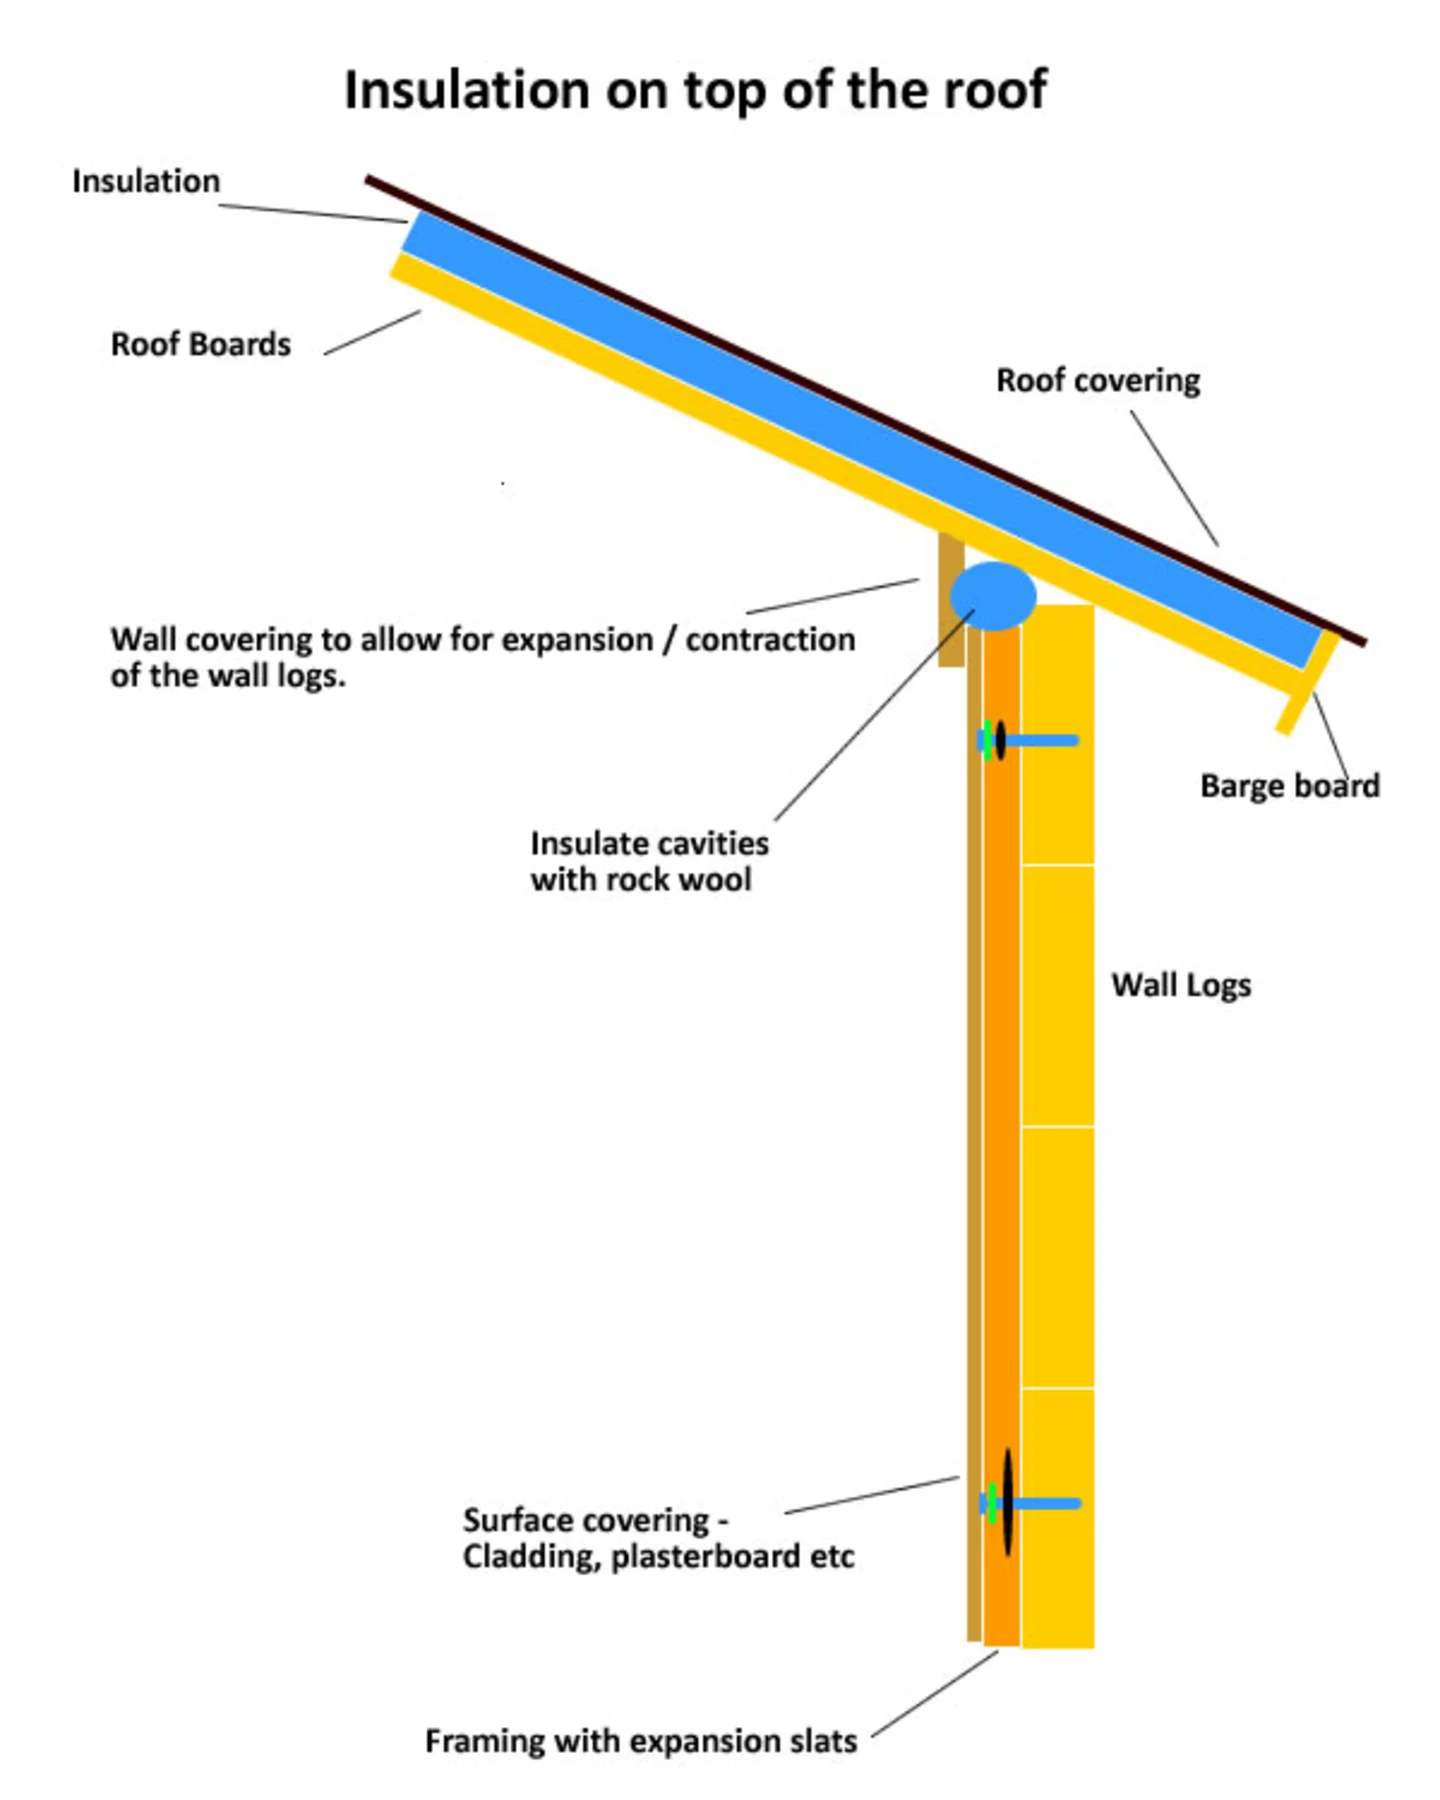
Insulation added on top of the roof with inner wall insulation
Make sure you allow enough room for contraction. With this example you can see I am keeping the inner framing below the roof boards as with contraction there is a chance the boards could sit on top of the frame making the wall logs separate.
I’ve used a fascia suspended from the ceiling that will sit in front of the inner wall but is not connected to it allowing it move up and down as the log cabin expands and contracts. Fill any cavity created with fibreglass insulation wool so it can also move.
In a previous article on roof insulation I was recommending 40mm – 50mm thick insulation. If you are going to use thicker which you may want to, you would need to ‘cell’ the roof and board on top of the insulation:
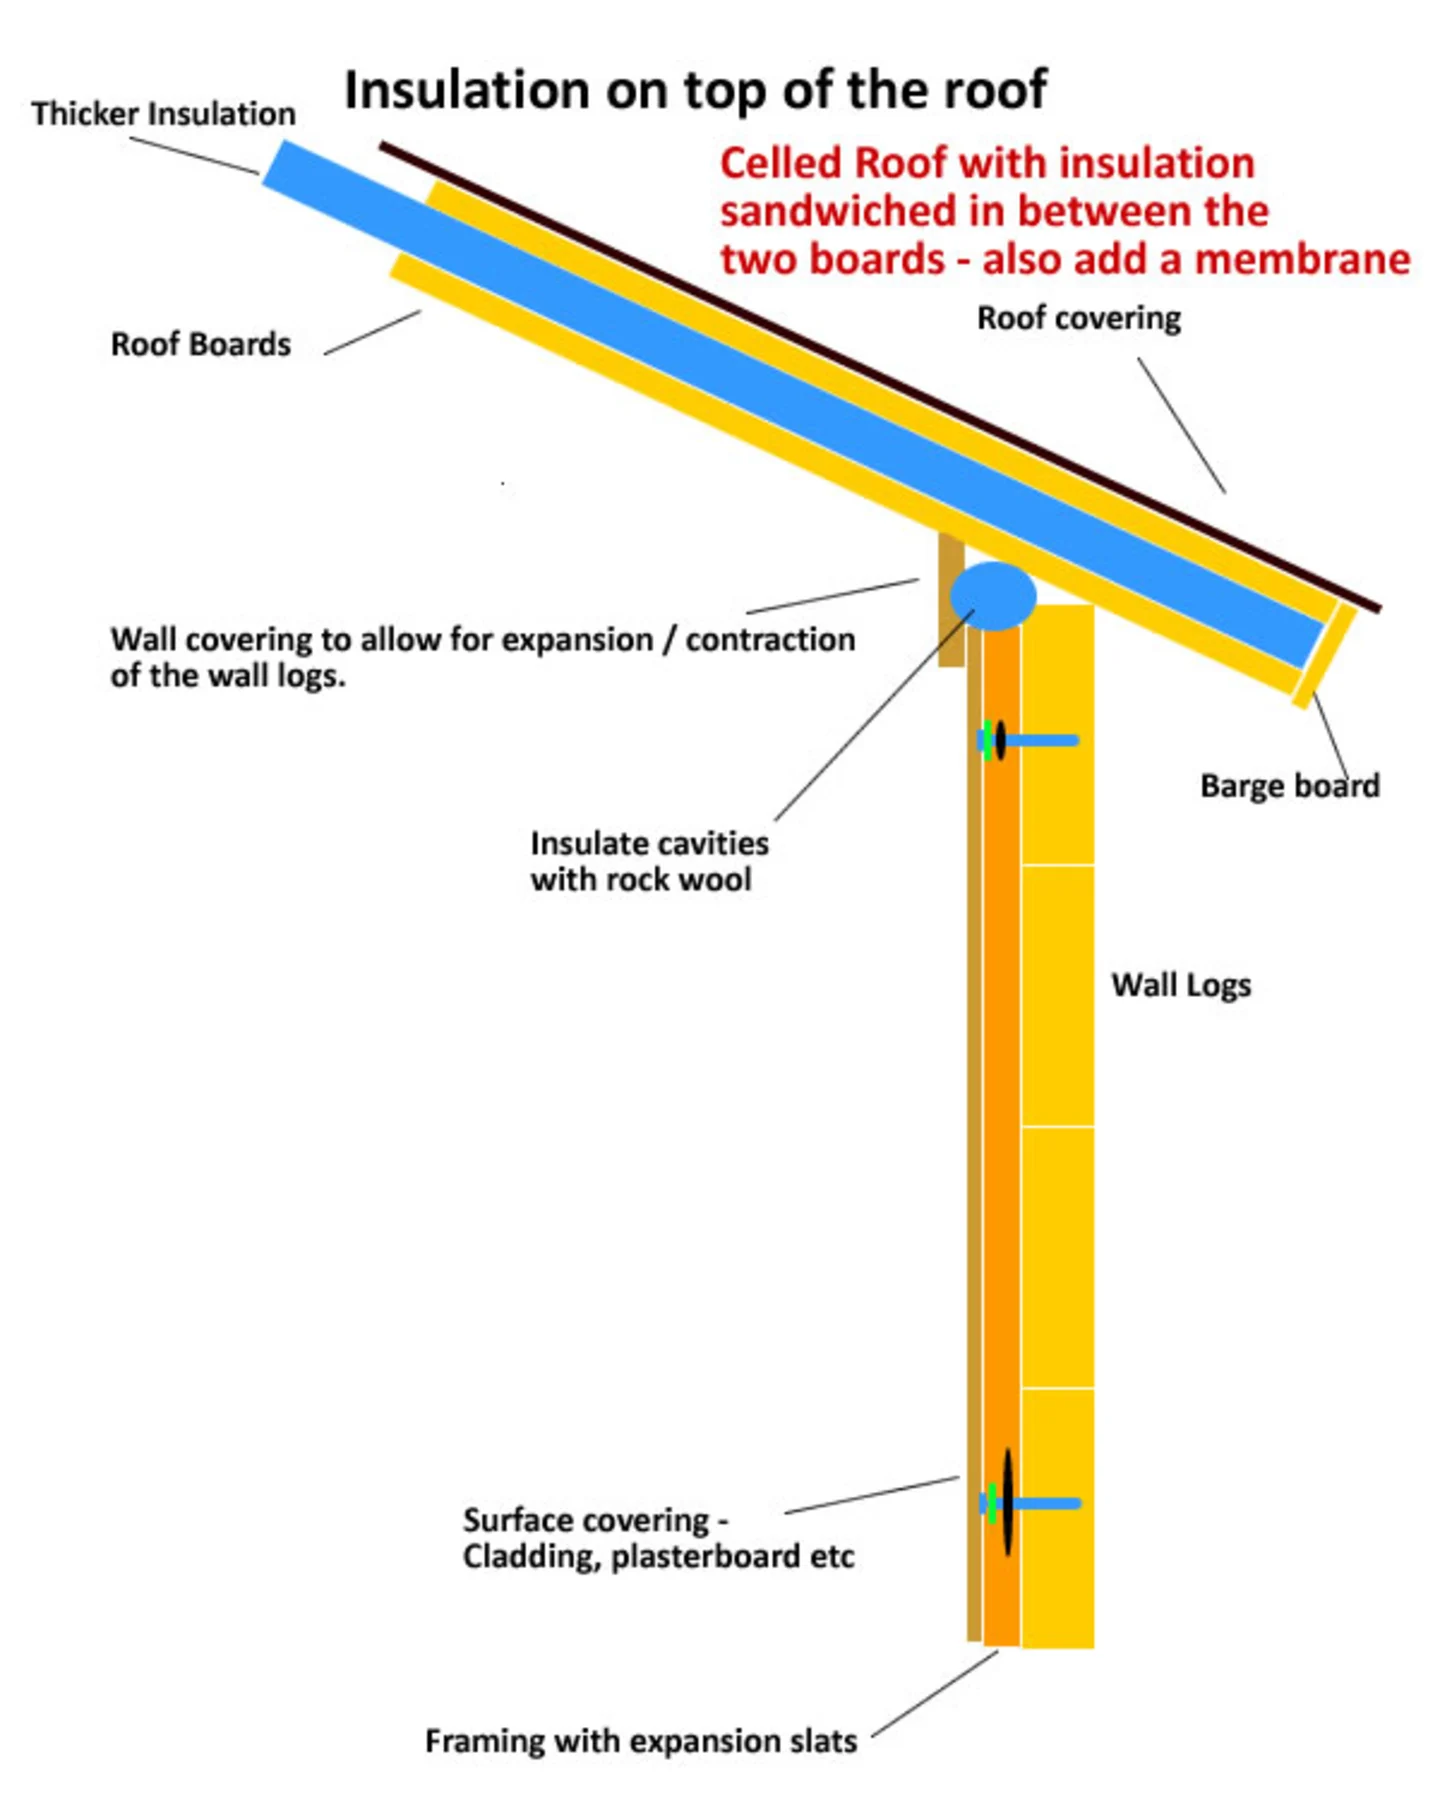
Using timber framing to cell the roof and infill with insulation boards
Some building control officers will ask for 100mm in the roof. To do this you will need to create a tray on the roof, then cell the tray and put in the insulation board with a final board on top and then the final roofing material. You may also wish to consider adding a breathable membrane.
If you wish to insulate under the cabin roof you could so within the purlins and then clad underneath them:
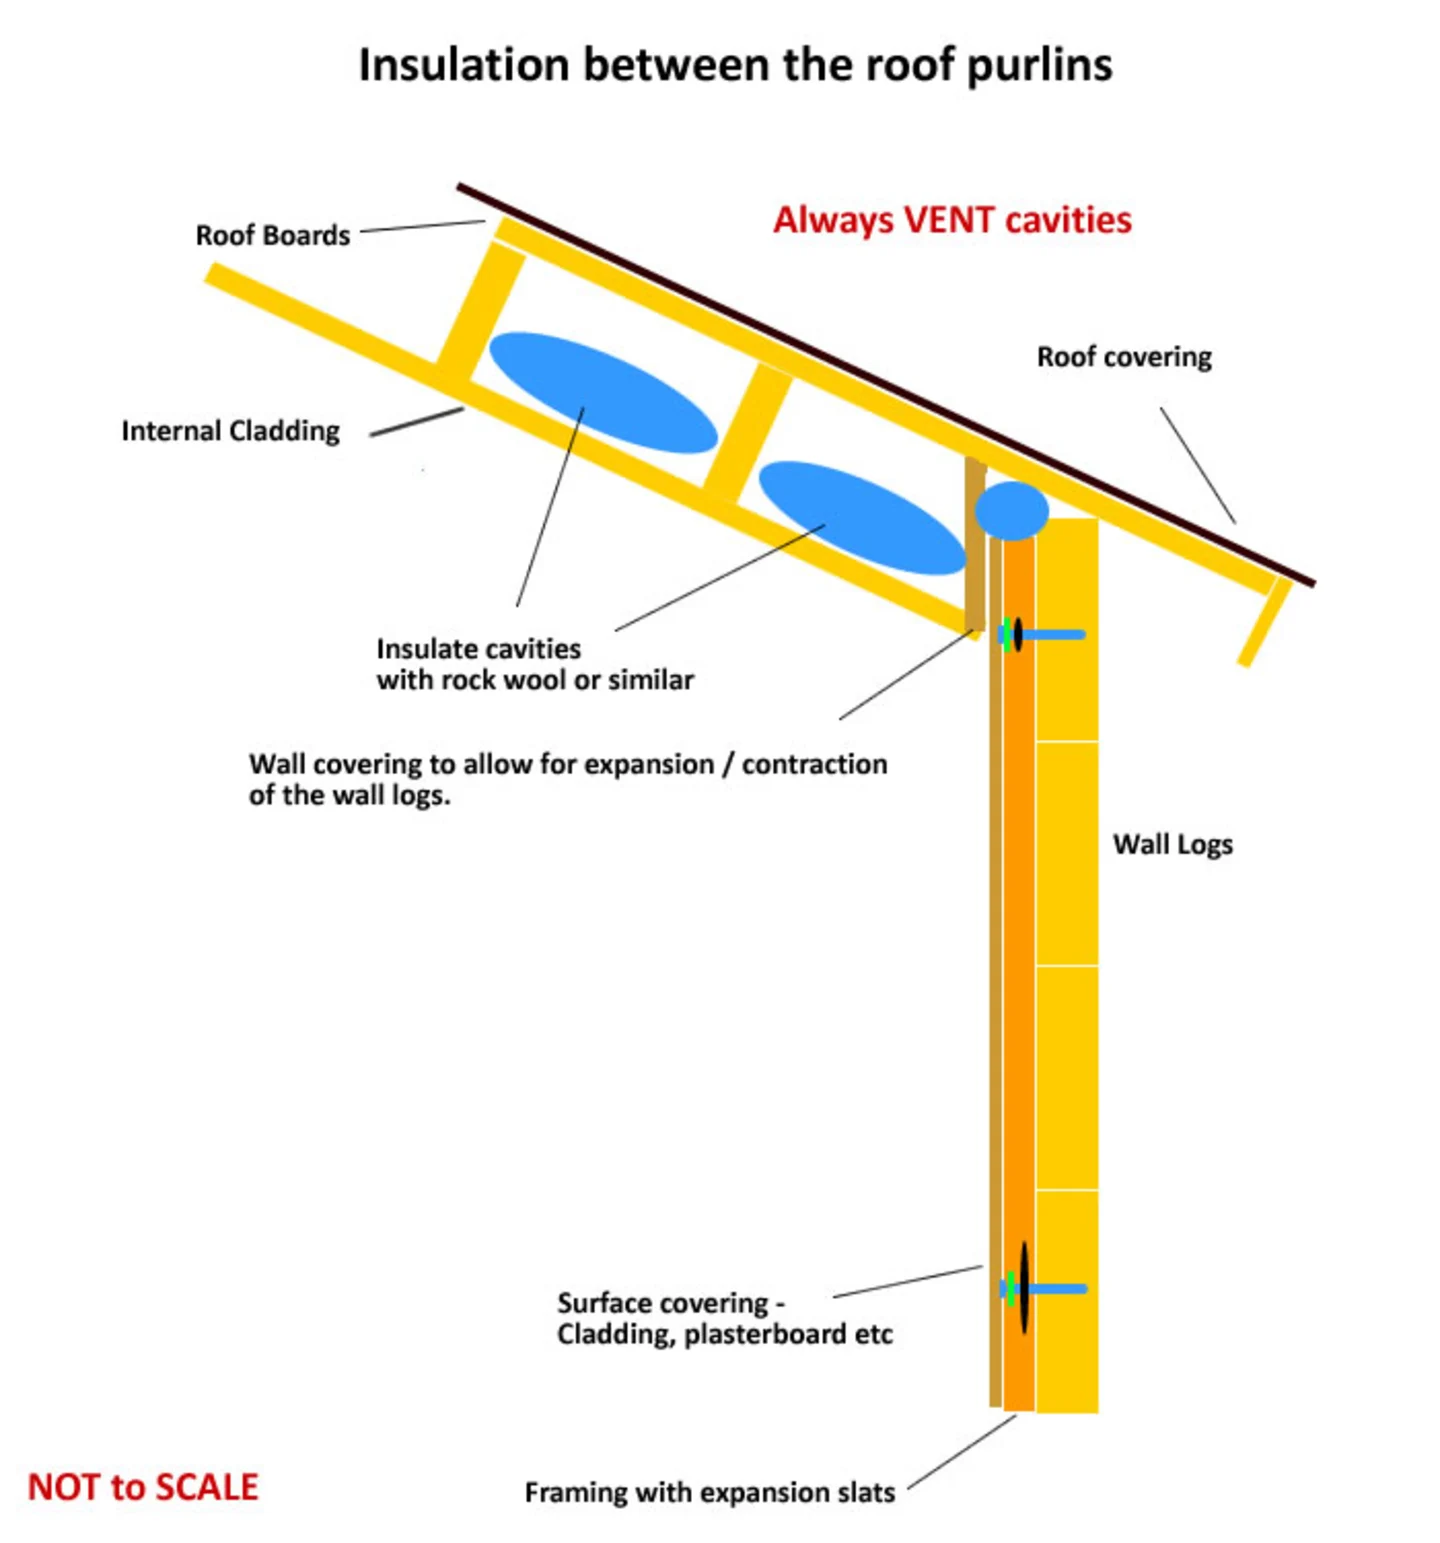
Using insulation in between the roof purlins
Another method you could consider is as follows:
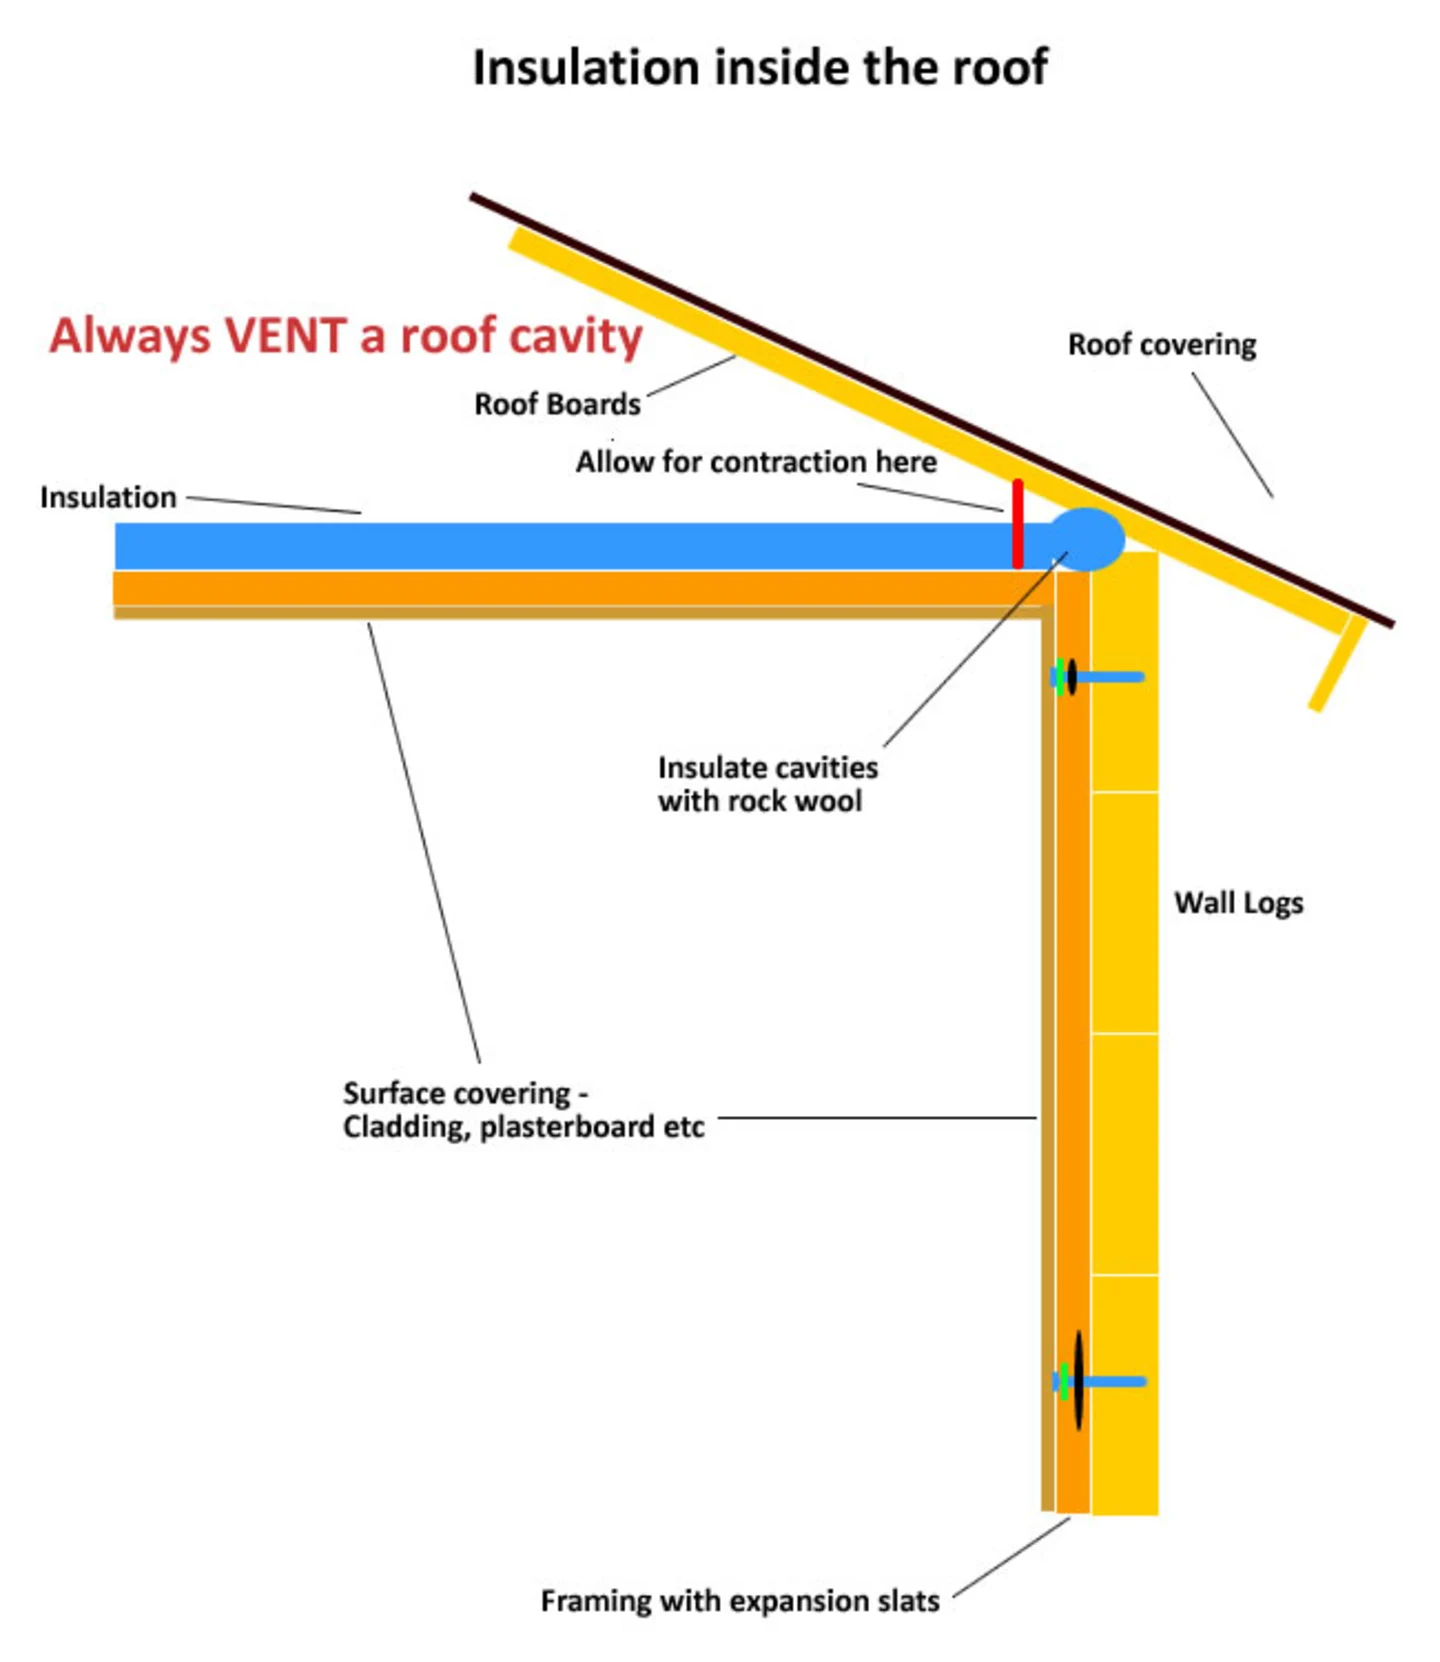
Creating a ceiling within a log cabin
Again like the methods above we are making sure there is enough room for expansion and contraction of the outer wall logs.
Please remember. If you create any voids to really consider venting them as a buildup of condensation can cause huge problems.
CABINS Summary of expansion / contraction in log cabins
Log cabins are an extremely versatile building and are very inexpensive. There are many uses for them, from a simple garden shed to a full blown family home. They will all behave the same and will all move all the time. So long as you remember and allow for this you can do anything you want to them. Including partition walls and internal insulating walls as I have shown.
Please Note: These are ideas for you to take away and use as you see fit. If you go on to carry out any of these ideas please let me know how you get on but this is not a simple DIY task and you will need some knowledge and understanding of the processes and materials involved.
One last thing; the windows and doors are also part of the outside wall so don’t join any of your internal framing to the doors or windows in anyway, treat them exactly the same as the logs.
Please ask me any questions you have on this or if you do use my ideas, please let us all know how you got on. Like the timber frame bases for log cabins none of this has a hard and fast rule except: Log cabins; Move!